Blog

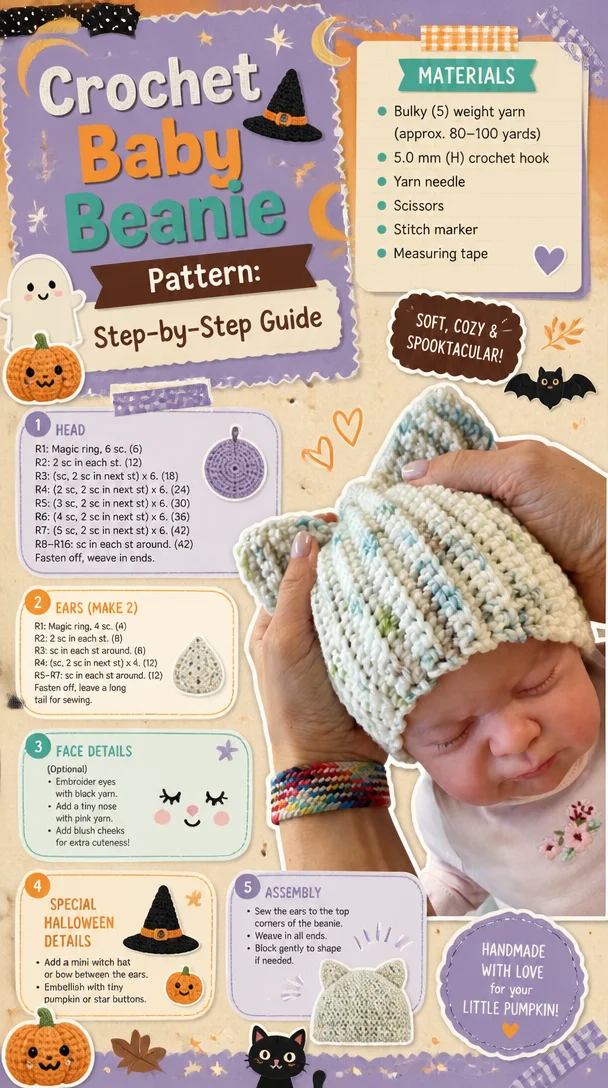
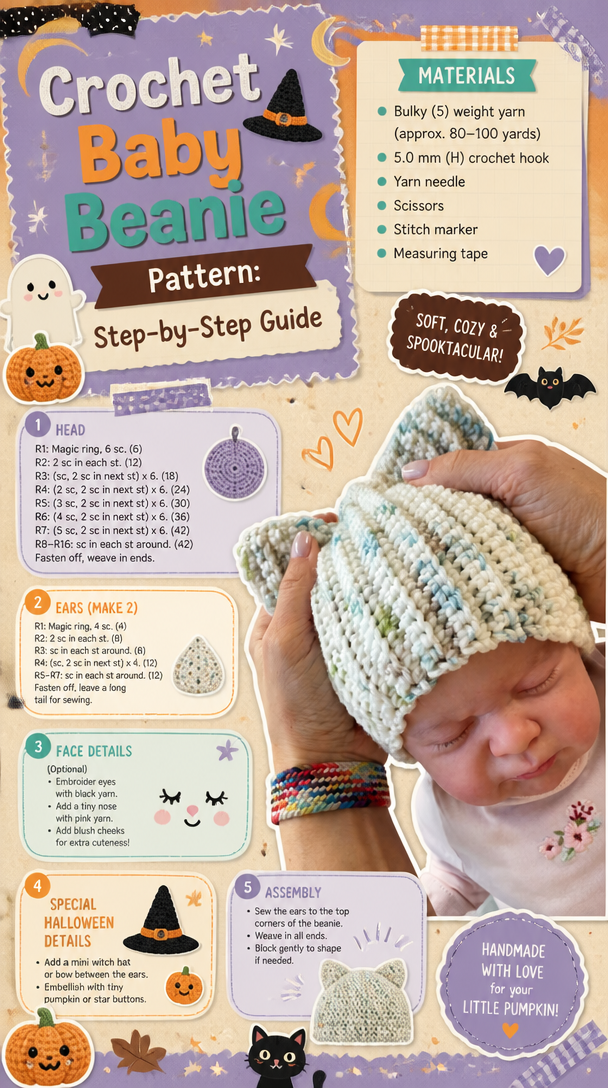
  • Crochet Baby Beanie Pattern: Step-by-Step Guide

    Crochet Baby Beanie Pattern: Step-by-Step Guide

    Article

    Crochet Baby Beanie Pattern: Step-by-Step Guide

    Easy Crochet Baby Beanie Tutorial

    Crocheting a baby beanie is a delightful way to create a thoughtful gift for new parents while also adding a touch of handmade charm to a newborn’s wardrobe. This quick and simple tutorial is perfect for beginners, and the finished product is both adorable and practical. Let’s dive into the steps!

    Materials Needed

    To get started on your crochet baby beanie, you’ll need the following materials:

    • Yarn: Choose a soft, baby-friendly yarn (approximately 100g).
    • Crochet Hook: Size H/8 (5mm) works great for most worsted weight yarns.
    • Scissors: For cutting your yarn.
    • Yarn Needle: For weaving in ends.

    Basic Stitches Used

    • Chain (ch): This is your foundation stitch.
    • Single Crochet (sc): A fundamental stitch used throughout the beanie.
    • Slip Stitch (sl st): Used to join rounds or close gaps.

    Pattern Instructions

    1. Create the Foundation Chain
      Start by making a slip knot, then chain 4.
      Join with a slip stitch to form a loop.
      Crochet Baby Beanie Pattern: Step-by-Step Guide
    2. Round 1
      Chain 1 and work 6 single crochets (sc) into the loop.
      Join with a slip stitch to the first sc.

    3. Round 2
      Chain 1, then work 2 sc in each stitch around (12 stitches total).
      Join with a slip stitch to the first sc.

    4. Round 3
      Chain 1, 1 sc in the next stitch, 2 sc in the next stitch; repeat from * around (18 stitches total).
      Join with a slip stitch.

    5. Continue Increasing
      For the following rounds, continue to increase by adding more single crochets between increases (24 stitches, then 30 stitches). You can adjust the size depending on the age of the baby.

    6. Add Length
      After reaching the desired circumference, simply crochet in single crochet for several rows without increasing.

    7. Finish the Beanie
      Once you reach your desired length (about 5-6 inches for newborns), fasten off and weave in the ends using a yarn needle.

    Tips for Success

    • Gauge Matters: Make a small gauge swatch to ensure the beanie will fit properly.
    • Color Choices: Feel free to experiment with different colors and patterns; stripes or solid colors can add personality.
    • Embellishments: For a finishing touch, consider adding a pom-pom or a cute little flower on top.

    Perfect Gift Idea

    This baby beanie is not only practical but also an adorable piece that every newborn can benefit from. Crocheted with love, it’s an ideal gift for baby showers or as a thoughtful gesture for new parents.

    Conclusion

    By following this simple crochet pattern, you can create beautiful and useful baby beanies in no time! Grab your materials and start crocheting today! For more patterns and tutorials, don’t forget to check out your favorite crochet resource or site. Happy crocheting!

    #BabyHat #CrochetTutorial #DIYBabyProjects #CrochetPattern
  • Crochet Baby Headband Patterns Bundle – Easy PDF Crochet Patterns for Beginners

    Crochet Baby Headband Patterns Bundle – Easy PDF Crochet Patterns for Beginners

    Article

    Crochet Baby Headband Patterns Bundle – Easy PDF Crochet Patterns for Beginners

    Crafting Adorable Baby Headbands: A Crochet Guide

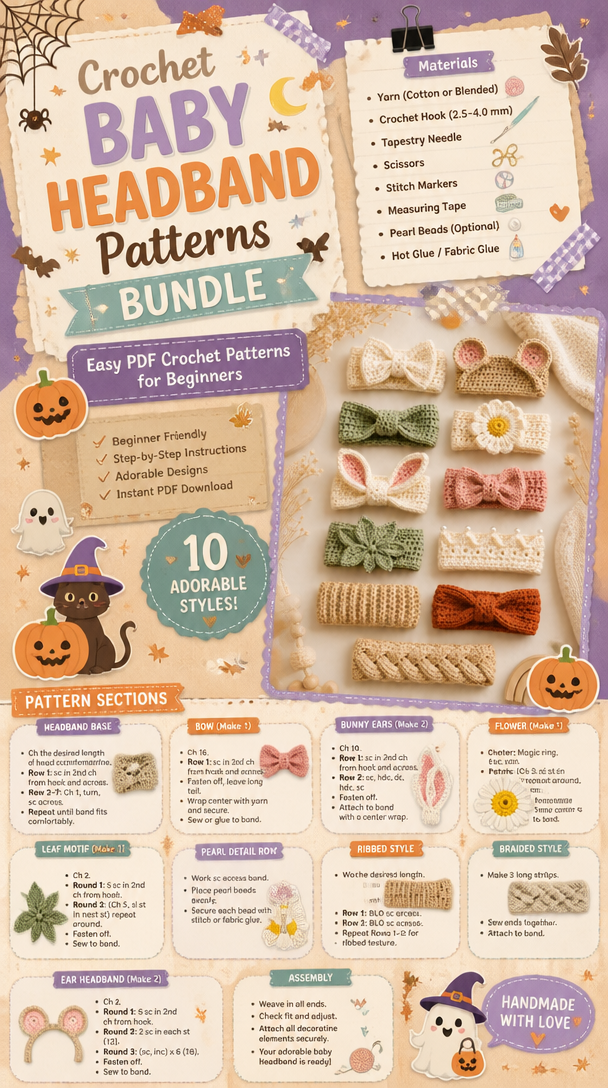
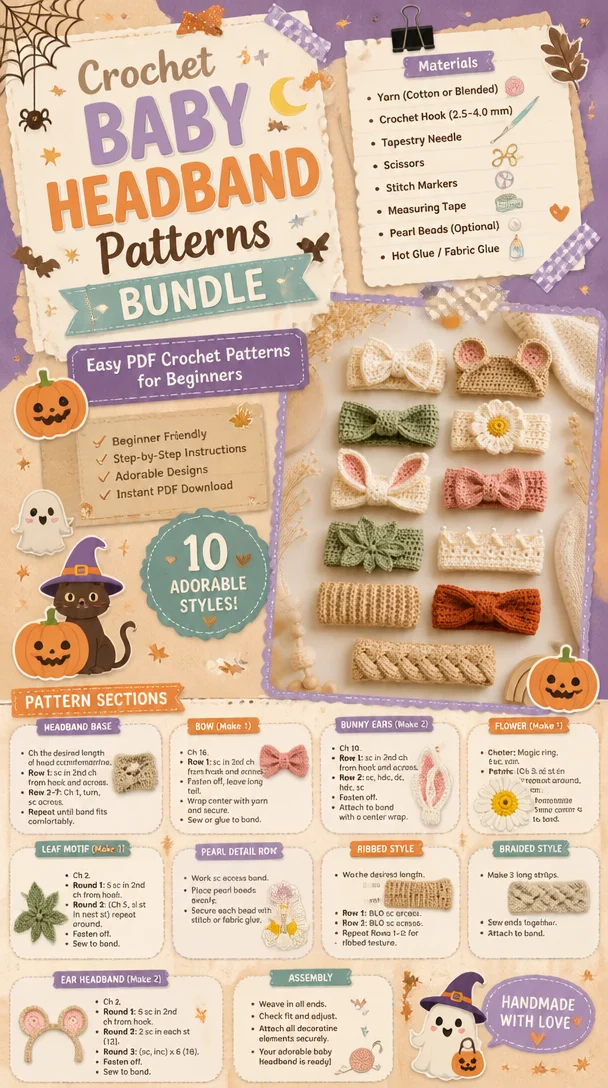
    Crocheting baby headbands is a delightful way to express creativity while crafting cute accessories for newborns and infants. With this collection of 10 unique crochet patterns, you can create charming headbands that are perfect for any little one. This PDF crochet bundle features a variety of designs, ensuring you’ll find something to suit your style and skill level.

    What’s Included in the PDF Crochet Bundle

    • Bow Headbands: Classic and timeless, these headbands feature adorable bows that can be customized in various colors.
    • Bunny Ears: Perfect for Easter or just for fun, these headbands will bring a smile to any little bunny lover’s face.
    • Bear Ears: Cute and cuddly, bear ear headbands are a great way to charm little ones and make perfect photo props.
    • Daisy Flower: Add a touch of whimsy with floral designs that are sure to brighten any outfit.
    • Crown Headbands: Make your little one feel like royalty with these regal crown designs.
    • Braided Headbands: These stylish updates on classic designs are perfect for a modern look.
    • Modern Aesthetic: Sleek and simple patterns that are versatile enough to pair with any outfit.

    Ideal for Beginners and Gift Giving

    These crochet patterns are designed for crafters at all skill levels, from complete beginners to those with a bit more experience. Each pattern comes with step-by-step instructions that use US crochet terminology, making it easy to follow along.

    These headbands also make fantastic gifts for baby showers! Handmade items carry a personal touch that store-bought gifts simply can’t match, making your creation not just a gift, but a cherished keepsake.

    Crochet Baby Headband Patterns Bundle - Easy PDF Crochet Patterns for Beginners

    Cozy, Modern Aesthetic

    The designs included in this collection combine a cozy feel with a modern aesthetic. This blend makes them perfect for both casual everyday wear and special occasions.

    Save This Craft Idea

    Don’t forget to save this pin for future reference. Whether you’re looking to expand your crocheting skills or create heartwarming gifts for loved ones, this collection of crochet baby headbands is an ideal project to keep on hand.

    Happy crocheting! 💛

  • Crochet Headbands for Babies and Toddlers

    Crochet Headbands for Babies and Toddlers

    Article

    Crochet Headbands for Babies and Toddlers

    Lovely Crochet Headbands for Babies and Toddlers

    Crochet headbands are a delightful accessory for babies and toddlers. Not only do they add charm to any outfit, but they can also provide a touch of warmth when needed. Whether you’re looking for a simple design or something more elaborate, a crochet headband is a fun and rewarding project that can be completed in a short amount of time.

    Why Crochet Headbands?

    One of the major benefits of crochet headbands is their versatility. They can be made in various sizes, colors, and patterns to match any wardrobe. Plus, they can be adorned with different embellishments, like bows, flowers, or buttons, offering endless possibilities for creativity.

    Benefits of Crochet Headbands:

    Crochet Headbands for Babies and Toddlers
    • Personalization: You can customize them in any color to match outfits or themes.
    • Comfort: Unlike some store-bought accessories, crochet headbands are soft and gentle on a baby’s sensitive skin.
    • Gifts: These headbands can make beautiful, handmade gifts for baby showers or birthdays.

    Getting Started: Tools and Materials

    Before diving into your crochet headband project, gather the following materials:

    • Yarn: Choose soft, baby-friendly yarn in your preferred colors.
    • Crochet Hook: A size appropriate for your yarn is essential.
    • Scissors: For cutting the yarn upon completion.
    • Yarn Needle: To weave in loose ends.

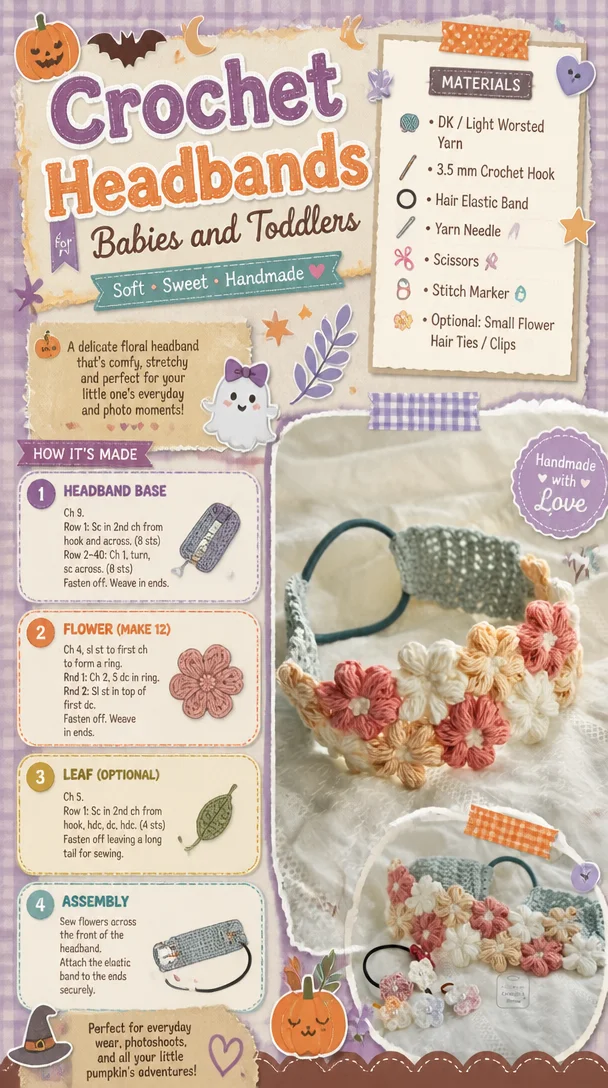
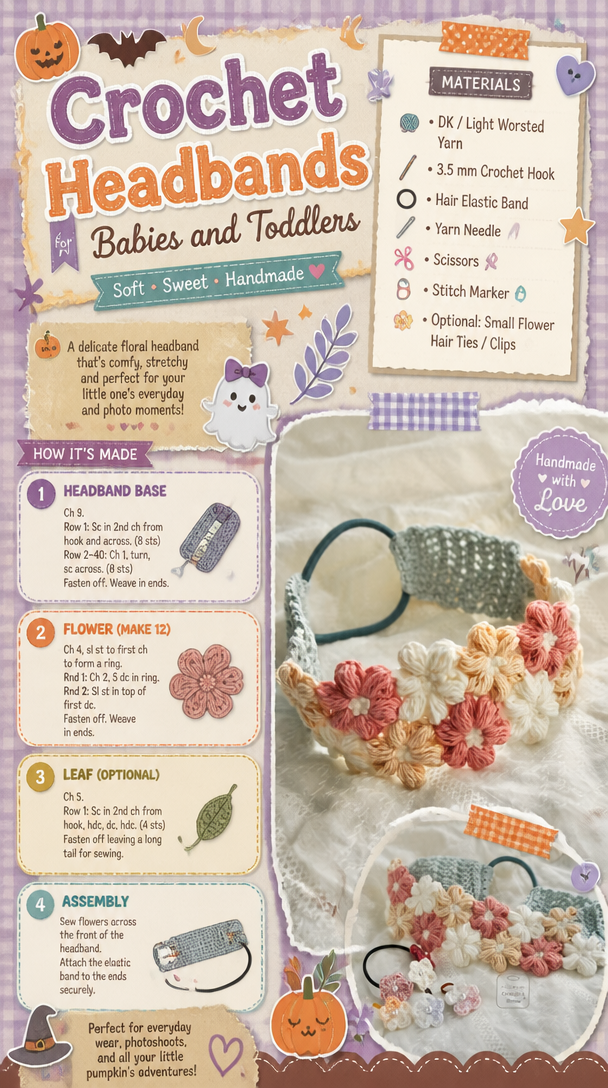
    Basic Crochet Headband Pattern

    Here’s a simple pattern suitable for beginners:

    1. Chain 60: (or adjust this based on your desired size)
    2. Row 1: Single crochet in second chain from hook, then single crochet across the row.
    3. Row 2: Chain 1, turn, and single crochet across again.
    4. Repeat Row 2: Until the headband reaches the desired width.
    5. Join Ends: Fold your piece in half and slip stitch or whip stitch the ends together.
    6. Add Embellishments: Consider sewing on a flower or bow for a finishing touch.

    Advanced Designs

    Once you master the basics, you can explore more intricate patterns! Ideas include:

    • Textured Patterns: Try using stitches like shell or puff stitches for added dimension.
    • Color Changes: Incorporate multiple colors in your design for a vibrant headband.
    • Seasonal Themes: Create headbands that reflect holidays or seasons, like a pumpkin headband for Halloween or a floral one for spring.

    Care Tips

    To keep your crochet headbands looking nice:

    • Hand wash in cold water with gentle soap.
    • Lay flat to dry to avoid stretching.
    • Store them in a cool, dry place away from direct sunlight.

    Conclusion

    Crochet headbands for babies and toddlers are not only adorable but also a fun, creative project to undertake. With basic tools and a little practice, you can create beautiful accessories that your little ones will love. Whether for personal use or as a thoughtful gift, these headbands make every outfit even cuter!

    For free patterns, tips, and inspiration, check out the Pattern Center. Happy crocheting!

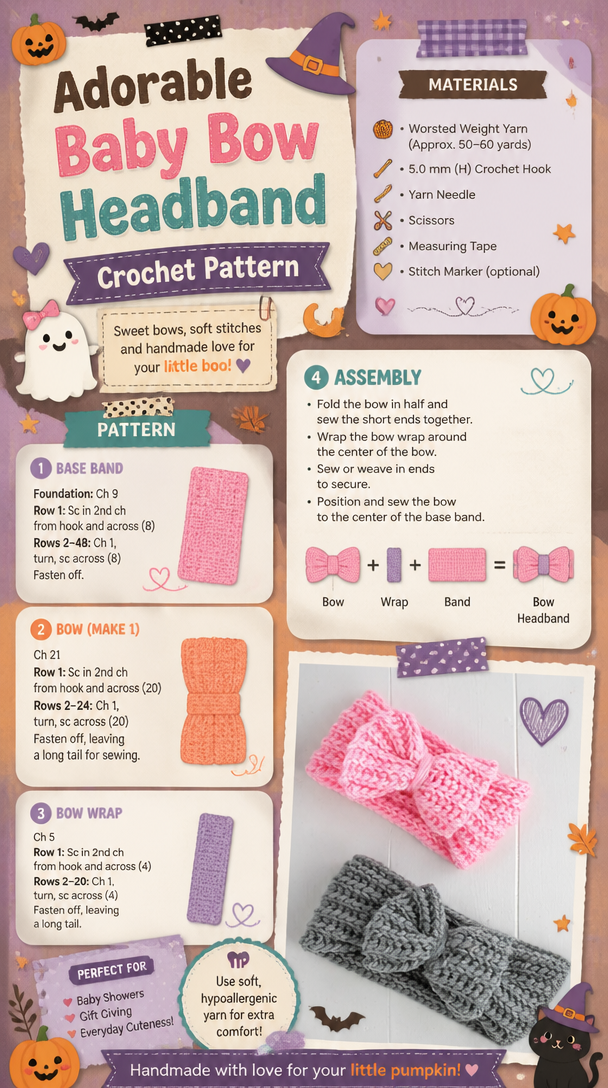
  • Adorable Baby Bow Headband Crochet Pattern

    Adorable Baby Bow Headband Crochet Pattern

    Article

    Adorable Baby Bow Headband Crochet Pattern

    The Rise of Sustainable Fashion

    In recent years, the fashion industry has seen a significant shift towards sustainability. As environmental concerns grow, both consumers and brands are reconsidering their impact on the planet. This article explores the key elements driving the rise of sustainable fashion.

    What is Sustainable Fashion?

    Sustainable fashion refers to clothing, shoes, and accessories that are produced, marketed, and used in a way that highlights social and environmental responsibility. This encompasses various practices, including the use of organic materials, fair labor practices, eco-friendly dyeing processes, and recyclable or biodegradable garments.

    Key Drivers of Sustainable Fashion

    1. Consumer Awareness
      More consumers are aware of the ethical and environmental issues associated with fast fashion. Documentaries, social media campaigns, and awareness initiatives have sparked greater interest in sustainable practices.

      Adorable Baby Bow Headband Crochet Pattern
    2. Ethical Production
      Brands are increasingly focusing on ethical production processes. This includes ensuring fair wages for workers, safe working conditions, and transparency in the supply chain.

    3. Innovative Materials
      Sustainable fashion is marked by innovations in materials, such as organic cotton, Tencel, and recycled polyester. These materials reduce the carbon footprint and environmental hazards associated with traditional fashion production.

    4. Circular Fashion
      The concept of circular fashion promotes the idea of reusing and recycling materials. Brands are adopting practices that allow products to be repurposed, repaired, or recycled at the end of their lifecycle.

    5. Government Regulations
      As awareness grows, many governments are implementing regulations to promote sustainable practices within the fashion industry. These regulations encourage companies to adopt eco-friendly practices or face penalties.

    Benefits of Sustainable Fashion

    • Environmental Protection: Reduced waste and lower resource consumption help combat climate change.
    • Social Responsibility: Adopting fair labor practices improves workers’ lives and communities.
    • Brand Loyalty: Consumers increasingly support brands aligning with their values, creating brand loyalty.
    • Economic Opportunities: Sustainable fashion fosters innovation and opens new markets for eco-conscious brands.

    Challenges Ahead

    Despite the positive momentum, sustainable fashion faces several challenges:

    • Cost: Sustainable products can be more expensive to produce, leading to higher prices for consumers.
    • Education: Ongoing education is required to inform consumers about the benefits and importance of sustainable choices.
    • Greenwashing: Some brands claim to be sustainable without backing it up, leading to confusion in the marketplace.

    Conclusion

    The evolution of sustainable fashion represents a promising shift in the industry. As consumers continue to demand responsible practices, the industry must adapt by embracing ethical production, innovative materials, and transparency. While challenges remain, the potential benefits of a more sustainable approach to fashion are undeniable.

    For those interested in exploring sustainable fashion, check out this resource for more insights and tips on making sustainable choices in your wardrobe.

  • How to Crochet a Pacifier Clip

    How to Crochet a Pacifier Clip

    Article

    How to Crochet a Pacifier Clip

    The Perfect Baby Shower Gift: Cute Pacifier Clips

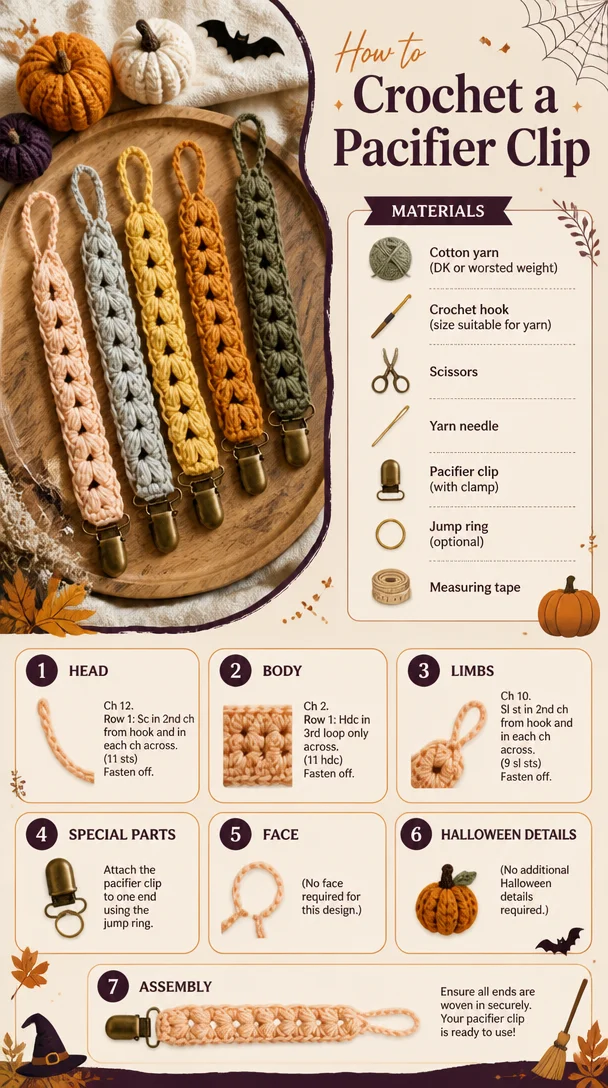
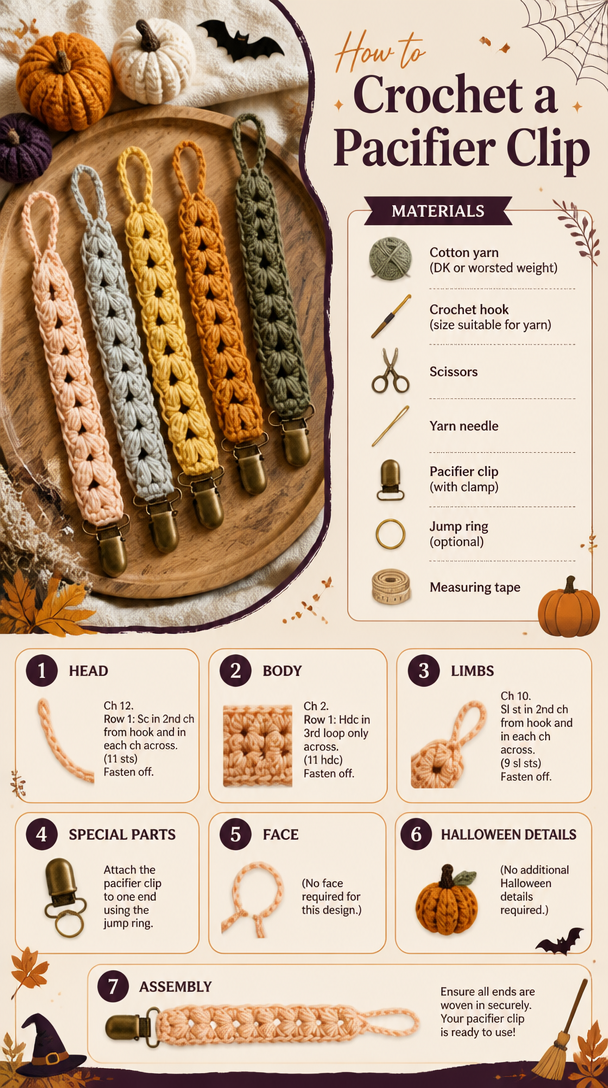
    When it comes to baby shower gifts, finding something unique and useful can be a challenge. One standout option is a handmade pacifier clip—especially one with a charming twist. These adorable pacifier clips, designed with a series of puff stitches to create an enchanting heart shape, not only serve a practical purpose but also add a touch of cuteness to any baby’s outfit.

    Why Choose a Pacifier Clip?

    Pacifier clips are essential for parents, as they help prevent pacifiers from falling on the ground, getting lost, or becoming dirty. They keep the pacifier conveniently attached to the baby’s clothing or stroller, making it easily accessible whenever it’s needed. A hand-crocheted clip combines functionality with handmade charm, making it a thoughtful gift choice.

    Features of the Heart-Shaped Paci Clip

    • Handmade Quality: Each paci clip is carefully crafted, giving it a personal touch that mass-produced items lack.
    • Charming Design: The heart shape created with puff stitches is not only cute but also adds a decorative element to the practical item.
    • Durable Materials: These clips are made to withstand the wear and tear of daily use, ensuring they last through countless adventures with your little one.
    • Versatile Gift: Perfect for baby showers, birthdays, or as a thoughtful addition to any newborn gift basket.

    How to Make Your Own

    If you’re feeling crafty, you can even create a pacifier clip by following the detailed instructions in the crochet pattern available online. It’s a rewarding project that allows you to customize colors and styles to match any baby’s nursery decor or personal taste.

    How to Crochet a Pacifier Clip

    For those interested, click the link for the digital crochet pattern: Crochet Pattern for Heart-Shaped Pacifier Clip.

    Conclusion

    A heart-shaped pacifier clip is more than just a gift; it’s a blend of functionality and artistic expression that any parent would appreciate. Whether you choose to gift one or make your own, this lovely accessory is bound to be a hit at any baby shower. So why not add this unique touch to your gift list and make it a memorable occasion?

  • Baby Bear Crocheted Hat Pattern

    Baby Bear Crocheted Hat Pattern

    Article

    Baby Bear Crocheted Hat Pattern

    5 Little Monsters: Baby Bear Crocheted Hat

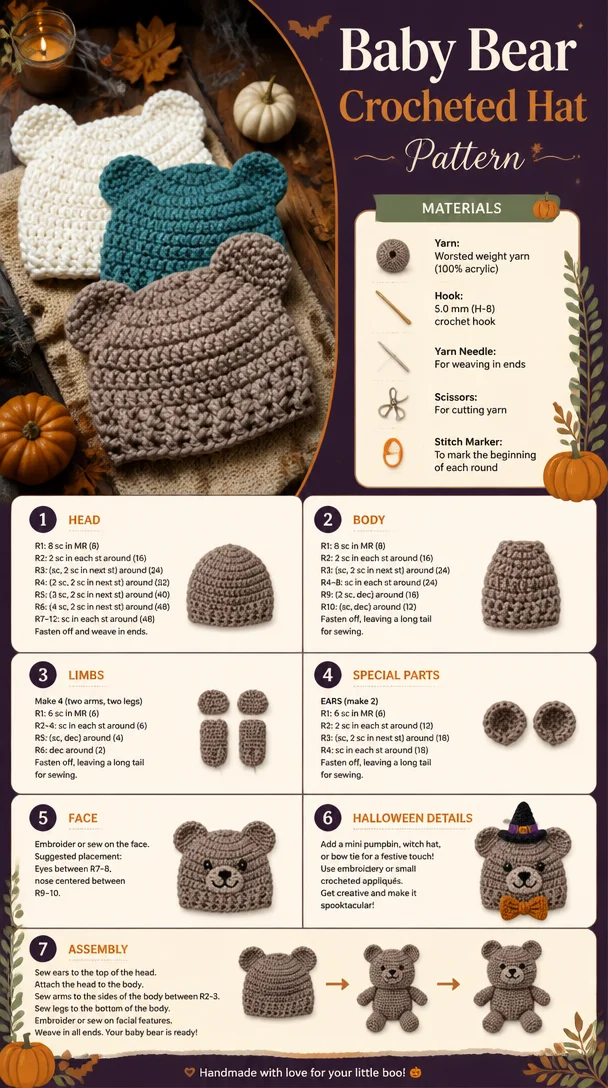
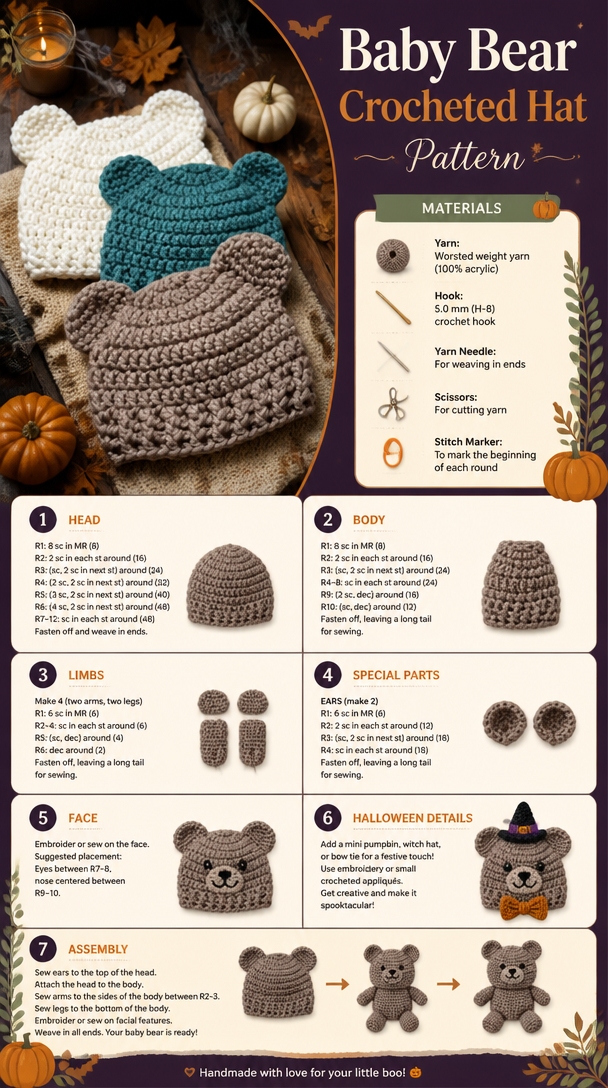
    Crocheting has become a beloved hobby for many, and one of the cutest creations emerging from this craft is the “Baby Bear Crocheted Hat.” This charming accessory not only provides warmth but also adds an adorable touch to any baby’s outfit. Here’s how you can make your own unique version.

    Materials Needed

    To start your Baby Bear Crocheted Hat, gather the following materials:

    • Soft, hypoallergenic yarn (in neutral colors like brown, beige, or cream)
    • A size G or H crochet hook
    • Scissors
    • Tapestry needle for weaving in ends
    • Measuring tape

    Instructions

    1. Measure the Head

    Before you start crocheting, measure the circumference of the baby’s head to ensure a perfect fit. Most newborns and infants have head sizes ranging from 13 to 16 inches.

    Baby Bear Crocheted Hat Pattern

    2. Create the Base

    Begin with a slip knot and chain the required number of stitches based on your head measurement. Adjust your foundation chain according to your gauge.

    3. Work in Rounds

    Start working in rounds. Using double crochets (or a stitch of your choice), create the body of the hat. Continue until you reach the desired height, usually about 5-7 inches for infants.

    4. Form the Ears

    For the adorable bear ears, create two smaller circles using the same yarn. You can add a contrasting color for the inner ear for a special touch. Attach the ears to the top of the hat securely.

    5. Add the Finishing Touches

    To enhance the bear theme, consider embroidering a cute face or sewing on a small bow. Make sure everything is securely attached to ensure safety for your little one.

    Care Tips

    To keep the Baby Bear Crocheted Hat in good condition, hand wash it in cold water and lay it flat to dry. This will preserve its shape and softness for many wears to come.

    Conclusion

    The Baby Bear Crocheted Hat is not just a practical accessory; it’s a labor of love that adds a touch of whimsy to any baby outfit. It also makes for a fantastic gift for baby showers or first birthdays. With this guide, you can create a one-of-a-kind piece to cherish or gift a new parent. Happy crocheting!

  • Free Crochet Patterns for Baby Turbans

    Free Crochet Patterns for Baby Turbans

    Article

    Free Crochet Patterns for Baby Turbans

    Discover Inspiring Crochet Patterns: Baby Turban Free Crochet Patterns

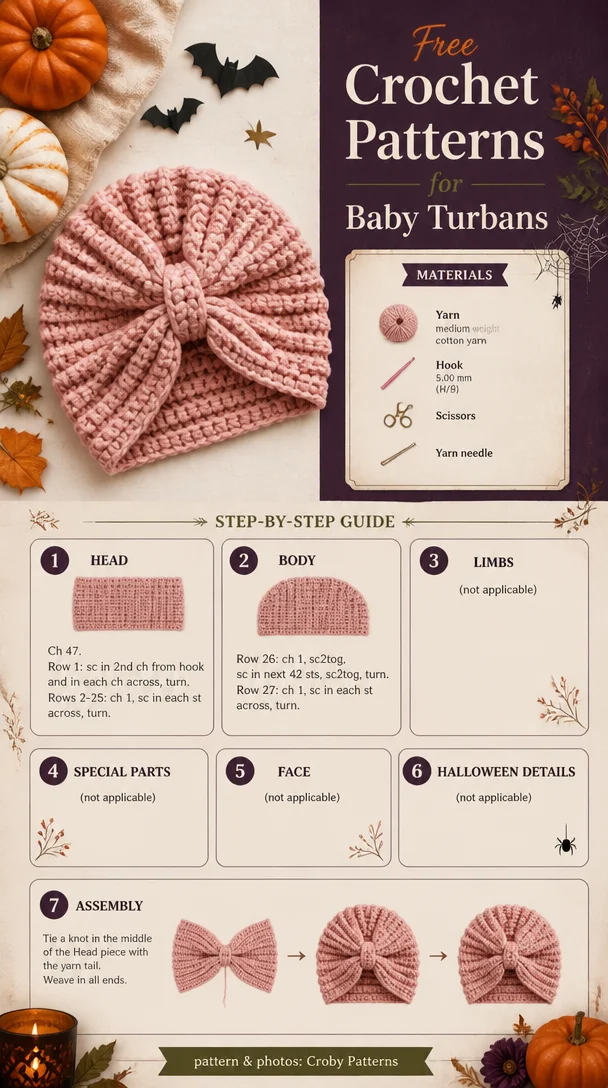
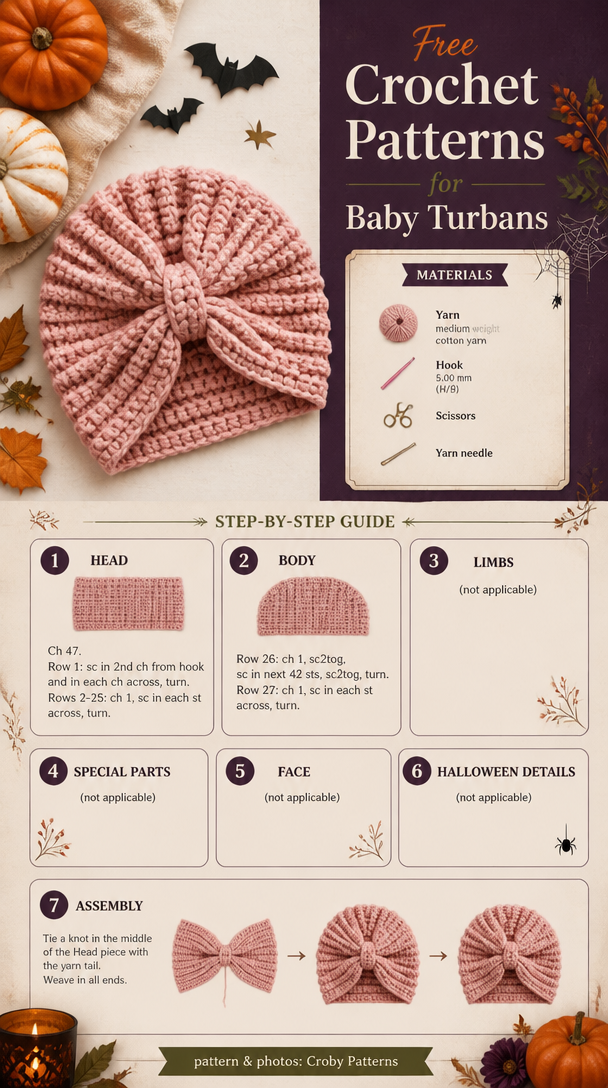
    Are you ready to unleash your creativity with crochet? Look no further than Explore Your Crochet’s free patterns blog, where a treasure trove of inspiring ideas awaits. One of our most delightful posts is dedicated to “Baby Turban Free Crochet Patterns,” perfect for those looking to craft adorably stylish headwear for the little ones in their lives.

    Why Crochet Baby Turbans?

    Crocheting baby turbans is not only a fun and engaging activity, but it also produces charming, practical items that any parent would love. Here are a few reasons to consider making these cute accessories:

    • Stylish and Unique: Baby turbans add a fashionable touch to any outfit, ensuring your little one looks adorable.
    • Versatile Patterns: With various patterns available, you can choose styles that suit different occasions—from casual wear to special events.
    • Quick Projects: These projects are generally quick to crochet, making them perfect for last-minute gifts or for those looking to boost their crafting skills.

    Featured Free Patterns

    In our blog post, you will find a selection of free crochet patterns that cater to various skill levels. Here are some highlights:

    Free Crochet Patterns for Baby Turbans
    1. Basic Baby Turban Pattern: A straightforward pattern suitable for beginners, this turban is easy to make and can be customized with different colors and yarns.
    2. Knot Style Turban: This chic pattern features a knot detail at the front, adding a trendy flair that’s perfect for photo shoots.
    3. Textured Baby Turban: Utilizing unique stitches, this pattern offers a cozy and warm option for cooler weather.
    4. Flower Embellished Turban: Ideal for special occasions, this pattern includes an adorable flower applique that elevates the overall design.

    Tips for Successful Crocheting

    To ensure your crochet experience is enjoyable and productive, consider these tips:

    • Select Quality Yarn: Choose soft, hypoallergenic yarn for comfort against baby skin.
    • Use the Right Hook Size: Refer to the pattern for the recommended hook size to achieve the perfect gauge.
    • Practice Your Stitches: If you’re trying a new stitch, take some time to practice before starting your project.
    • Stay Organized: Keep your supplies organized to make the crocheting process smoother and more enjoyable.

    Join the Crochet Community

    Crocheting can be a solitary hobby, but it can also be incredibly social! Join online forums, social media groups, or local crochet clubs to connect with fellow enthusiasts. Share your projects and gain inspiration from others.

    To dive deeper into the world of crochet and access our collection of “Baby Turban Free Crochet Patterns,” visit our blog at Explore Your Crochet and let your creativity flow!

    Conclusion

    Whether you are an experienced crocheter or just starting, there’s always something new to learn and create. The “Baby Turban Free Crochet Patterns” post at Explore Your Crochet will inspire you to pick up your hook and yarn, transforming simple strands into adorable accessories that will bring joy to both you and the little ones in your life. Happy Crocheting!

  • Free Pumpkin Pacifier Clip Crochet Pattern

    Free Pumpkin Pacifier Clip Crochet Pattern

    Article

    Free Pumpkin Pacifier Clip Crochet Pattern

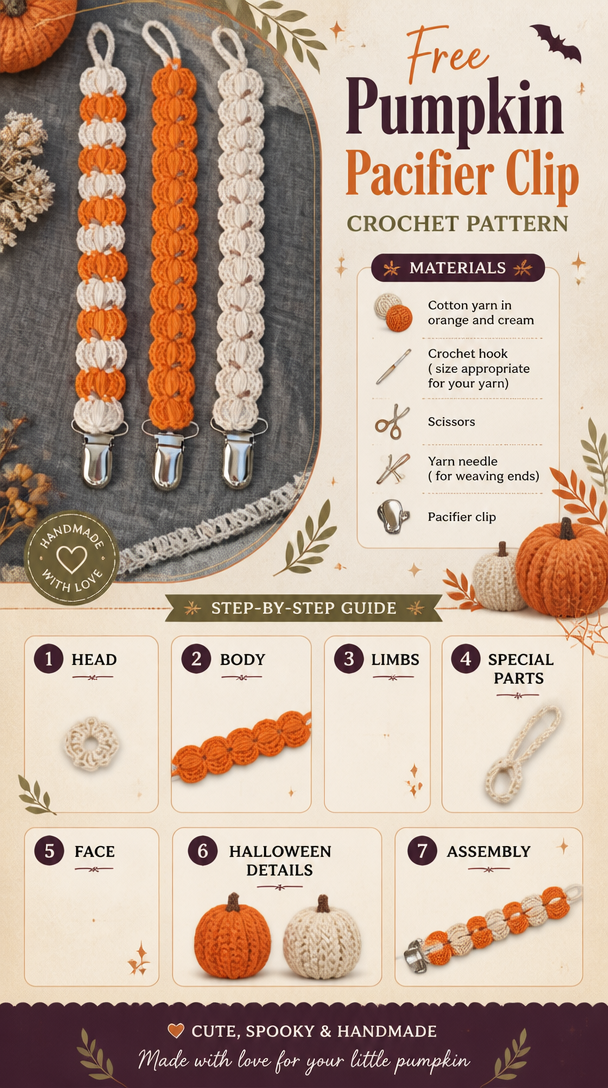
    Add a Festive Touch to Your Baby’s Essentials with a Crochet Pumpkin Chain Pacifier Holder

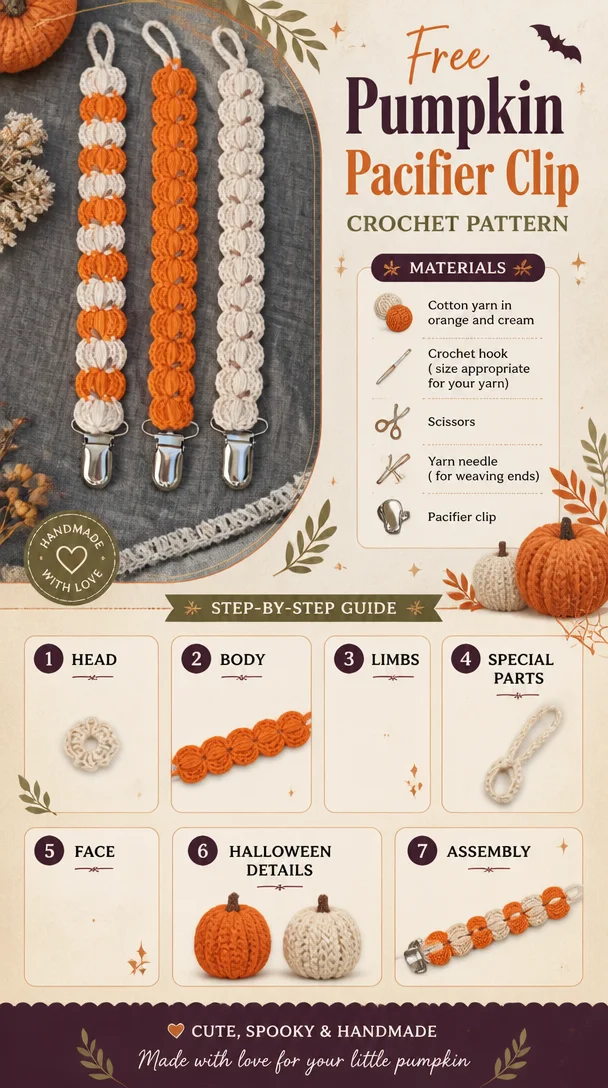
    As autumn arrives and the leaves begin to change, it’s the perfect time to celebrate the season with delightful and seasonal accessories for your little one. One charming way to embrace the spirit of fall is by creating a crochet pumpkin chain pacifier holder. This playful project not only serves a practical purpose but also adds a festive flair to your baby’s wardrobe.

    Why a Crochet Pumpkin Chain Pacifier Holder?

    A pacifier holder is an essential accessory for parents. It keeps the pacifier secure and within reach, preventing it from falling on the floor or getting lost. By adding a crochet pumpkin design, you transform a simple item into a cute seasonal adornment. Each pumpkin-shaped link not only captures the fun of fall but also showcases your crochet skills.

    What You’ll Need

    To get started on your pumpkin chain pacifier holder, you’ll need:

    Free Pumpkin Pacifier Clip Crochet Pattern
    • Worsted weight yarn in orange, green, and brown
    • A suitable crochet hook (typically 4.5mm or H/8)
    • Scissors
    • A yarn needle for weaving in ends
    • A pacifier clip or clip-on attachment

    Steps to Create Your Pumpkin Chain

    1. Crochet Pumpkin Links:

      • Begin by making small pumpkin shapes using the orange yarn. Each pumpkin will be created using simple stitches and will make up the links of your chain.
      • Add a green top to each pumpkin using the green yarn to replicate the leaf.
      • Don’t forget to weave in all the ends for a clean finish.
    2. Assemble the Chain:

      • Create a series of pumpkin links to form a chain. You can customize the length based on your preference.
      • Securely attach each pumpkin link with a slip stitch or by crocheting them directly together.
    3. Attach the Pacifier Clip:

      • Once your pumpkin chain is complete, attach one end to your pacifier clip. This will allow you to easily fasten it to your baby’s outfit.
    4. Finishing Touches:

      • Ensure that everything is securely fastened, and add any decorative elements like additional leaves or vines if desired.

    Benefits of Crochet Projects

    Crocheting is not only a great way to create unique accessories but it also has several benefits:

    • Personalized Gifts: Handmade items make thoughtful gifts for baby showers or new parents.
    • Cost-Effective: Creating your essentials can save money while allowing you to use materials of your choice.
    • Fun and Therapeutic: Crocheting can be a relaxing hobby, perfect for reducing stress.

    Conclusion

    This crochet pumpkin chain pacifier holder is an excellent addition to any baby’s autumn wardrobe. With its charming design and practical use, it’s a project that blends functionality with seasonal fun. Ready to get started? Use the free crochet pattern to create your own delightful fall accessory today!

    For more tips and patterns, check out Yarn Patterns. Embrace the spirit of the season while keeping your baby stylish and comfortable!

  • Cosy Hexi Cardi

    Cosy Hexi Cardi

    Article

    Cosy Hexi Cardi

    The Versatile Granny Spike Stitch Cardigan

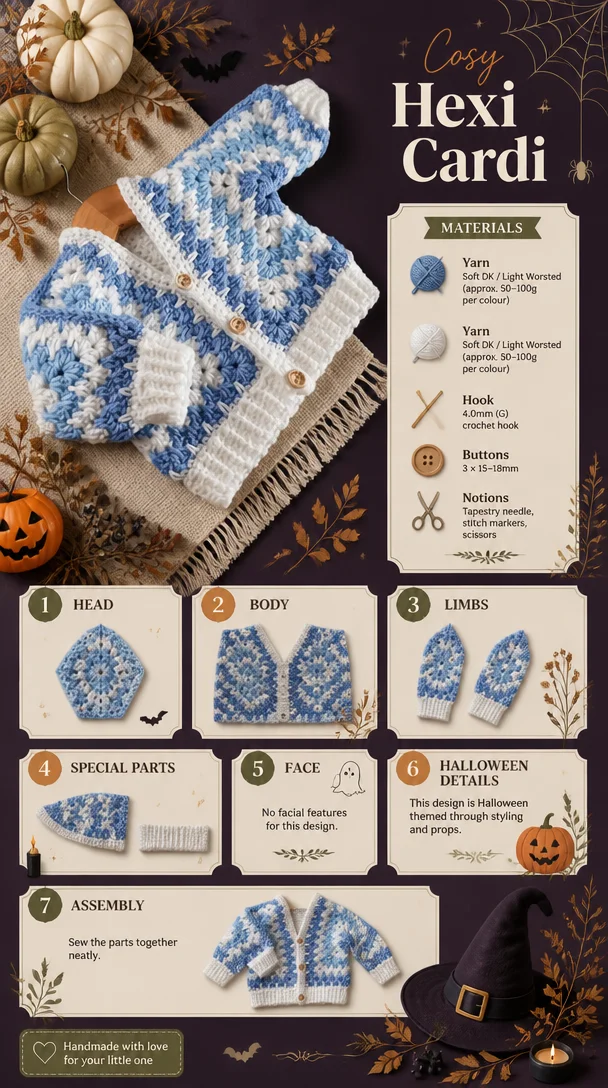
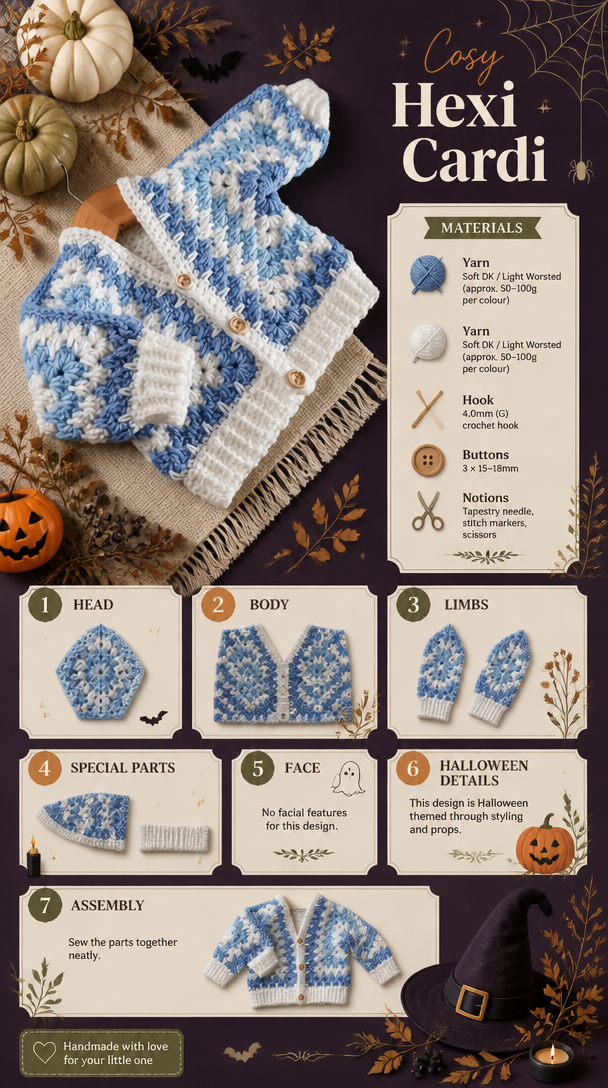
    Looking for a unique and customizable cardigan pattern? This stunning cardigan design features two hexagons crafted using the traditional granny spike stitch. Tailored to fit anyone from infants to adults, this pattern is perfect for makers of all skill levels seeking a personal touch in their wardrobe.

    Customization at Its Finest

    One of the standout features of this cardigan pattern is its adaptability. It is designed to be made to measure, so you can experiment with any weight of yarn and hook that suits your preference. Whether you’re working with a lightweight cotton yarn for summer or a chunky wool blend for winter, this pattern offers the flexibility to adjust to your needs.

    Comprehensive Size Range

    To ensure that everyone can enjoy this cozy cardigan, the pattern comes with a detailed size chart that accommodates a wide range of measurements—from sizes 0-3 months up to adult 5XL. This extensive sizing allows for a family or group project, where multiple cardigans can be crafted to fit everyone.

    Cosy Hexi Cardi

    Easy to Follow Instructions

    The PDF pattern is written in English using US terms, with abbreviations included for UK guilders. This makes it accessible to crocheters worldwide. Additionally, the pattern includes a wealth of photographs that illustrate each step of the construction process, ensuring that you feel confident as you work your way through the project.

    Conclusion

    The granny spike stitch cardigan is not only a fashion statement but also a great project that brings family and friends together through crafting. With its customizability and detailed instruction, you can create a beautiful, one-of-a-kind cardigan that fits perfectly and is treasured for years to come.

    Explore your creative side and start making this versatile cardigan today—your personalized masterpiece awaits!

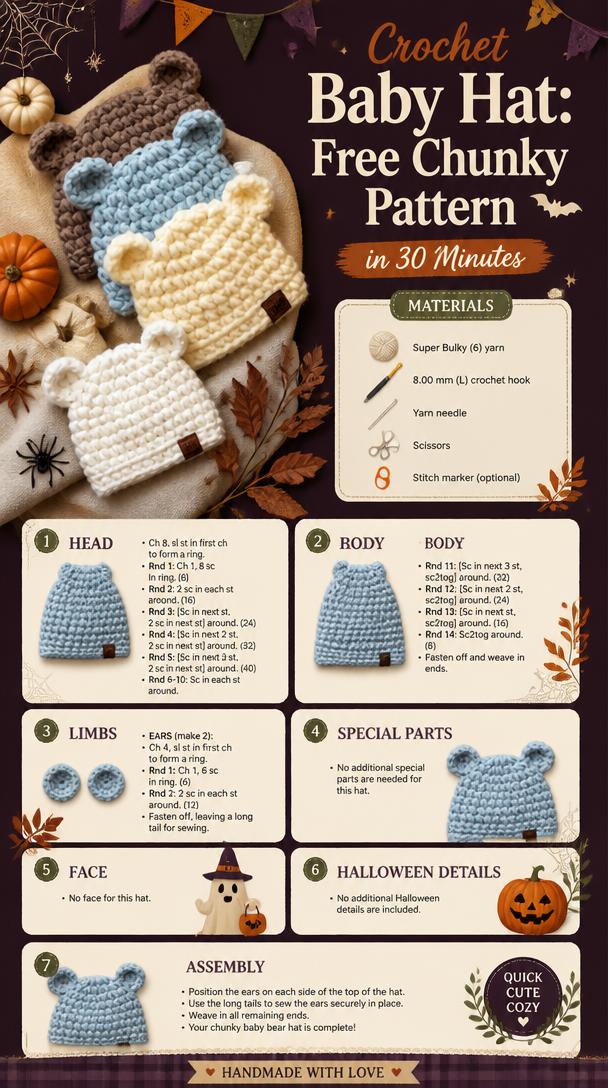
  • Crochet Baby Hat: Free Chunky Pattern in 30 Minutes

    Crochet Baby Hat: Free Chunky Pattern in 30 Minutes

    Article

    Crochet Baby Hat: Free Chunky Pattern in 30 Minutes

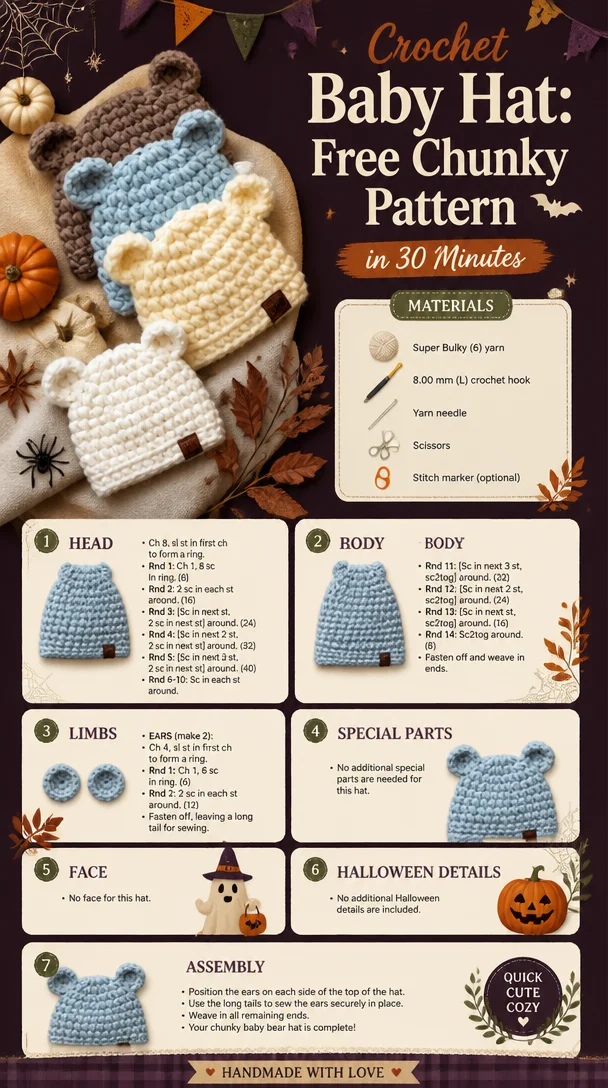
    Easy Crochet Baby Hat Pattern for Beginners

    If you’re looking for a simple and charming crochet project, this easy free crochet baby hat pattern is perfect for you. Designed with beginners in mind, it allows you to create adorable hats for babies in four different sizes, including one suitable for newborns. The versatility of this pattern means you can make hats that look fantastic on both girls and boys—ideal for gifting or personal use.

    Why Choose This Baby Hat Pattern?

    1. Beginner-Friendly: This pattern is straightforward and easy to follow, making it a wonderful choice for new crocheters.
    2. Size Versatility: With sizes ranging from newborn to larger baby heads, you can customize your project according to your needs or the size of your little one.
    3. Quick Project: With just 30-45 yards of yarn needed, you can whip up one of these hats in no time. It’s perfect for those looking for a quick, satisfying project.
    4. Fashionable: The design is simple yet chic, ensuring that your finished product will be an attractive accessory for any baby outfit.

    Materials You Will Need

    • Yarn: 30-45 yards of medium-weight yarn (acrylic or cotton recommended).
    • Crochet Hook: Size H/8 (5 mm) or based on your yarn choice.
    • Scissors: For cutting the yarn.
    • Tapestry Needle: For weaving in the ends.
    • Measuring Tape: To measure the size of the baby’s head if necessary.

    Basic Instructions

    1. Choose the Size: Before starting, refer to the chart below to determine the size you want to crochet.

      | Size | Head Circumference | |———–|———————| | Newborn | 13-14 inches | | 0-3 Months | 14-16 inches | | 3-6 Months | 16-18 inches | | 6-12 Months| 18-20 inches |

      Crochet Baby Hat: Free Chunky Pattern in 30 Minutes
    2. Start Crocheting:

      • Begin with a magic circle or chain 4 and join to form a ring.
      • Round 1: Chain 2, and work 10 double crochets (dc) into the circle. Join with a slip stitch (sl st) to the top of the first dc.
      • Round 2: Chain 2, then 2 dc in each stitch around. Join with a sl st.
      • Round 3 and beyond: Continue increasing as per desired size, alternating between rounds of dc and increases until you reach your target size.
    3. Finishing Touches:

      • Once you’ve reached the desired length, you can add decorative elements like pom-poms, ribbing, or a simple floral embellishment.
      • Cut the yarn and weave in all ends with the tapestry needle for a clean finish.

    Personalization Ideas

    • Colors: Use pastel shades for a soft look, or bright colors for a fun vibe.
    • Textures: Combine different yarns or stitches for added dimension.
    • Embellishments: Consider adding cute appliqués or buttons for extra charm.

    Conclusion

    This easy crochet baby hat pattern is a great way for beginners to practice their skills while creating something special. It’s not only a delightful project but also a meaningful gift that parents will treasure. Whether you are preparing for a baby shower, crafting for your own bundle of joy, or just looking to hone your crochet skills, this pattern is a wonderful addition to your crafting repertoire. Give it a try and enjoy the process of making something lovingly handmade!